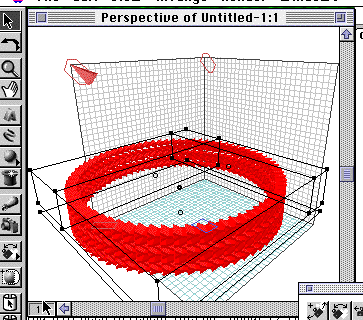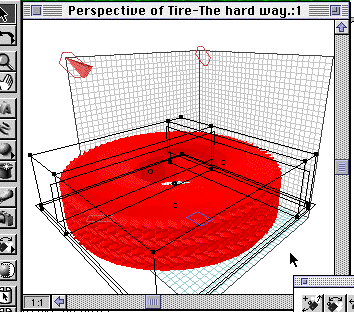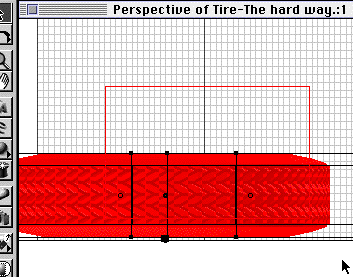
Following is the instructional text I posted to the Raydream Users' listserve
group:
This post is very old, but still useful. I do not have time at this moment
to update the info. Sorry.
Subject: Rendering a tire without using shaders to depict the tread.
Please note: I am using RDD 4.0.5 on a powermac and assume that the
interfaces are comparable...

1. Make a "Y" shape like the one you want in the free-form modeler - Even
use the text tool if you want... (Ariel or Helvetica Bold does well) Be
sure that it follows along the path for a little deeper than you want the
tread to become. This will now be referred to as the "Y-pathed". Click
"done"

2. Lay the "Y-pathed" sideways. Like this    >-    in the working box.

3. Duplicate with command or control "D" depending on your computer's
platform. Change its Z coordinate using the Numerical Properties window...(
the one with Yaw... Pitch... and Roll... described in it... found with
command or control "I") ... anyways... change the Z coordinate so that it
sits higher and away from the original... (or shift drag the projection of
it on one of the working box's walls.) high enough to look okay by eye...
Now you should have 2 "Y"s sideways over each other.

4. Rotate the upper "Y" with the rotation tool (NOT the virtual trackball)
on the wall holding down the shift key. This constrains your turning of the
object. Turn until you have turned it 180�. Now you should have one ">-"
and one   " -< "  over each other...Please accept these as my attempt to
make a sideways "Y" in a word processor...

5. Selecting the SECOND "Y" and pressing command or control D again will
generate new "Y"s over the last by as much as the first two AND rotate the
new one to be oppositely oriented from the last... It's really cool when
the computer does this much work for you all in one step...

6. Keep using command D until you have enough "Y"s for the width of the tire.

7. Select all of the "Y"s and group them. Then center their group's hot
spot. (I forget the key stroke... I'm not in RDD as I write this... I
should emphasize the speed increase of your work if you learn the
keystrokes specific to your computer's platform. Don't memorize them all,
learn the ones you use.)

8. Move to a new camera that looks straight down in isometric view so that
the "Y-pathed group" is in the RHS of the camera's view window.
9. Shift-drag (constraining the movement) the group's hot point to a
distance LEFT or RIGHT of the group which will also be the future center of
the tire... (I used left, but couldn't do the illustration below that
way...text alignment and all that...) whereas the group's location is now
the outer edge... The hot spot should be directly in line with the path
that the "Y-pathed" follows.

IE:

-<
>-
-<-------------- *  <---(hot spot)
>-
-<

10. Command or control D (One of my favorite commands.... ;-)      )

11. Change the group's YAW value using the Numerical Properties window by,
say, 5� or 6�... something that goes evenly into 360. (Total # of degrees
in a circle- I'm not talking down to anyone... just trying to be clear.
Please bear with me.) Because the duplication and rotation will be about
the hot point, the group will now be generated around the circumference of
the future tire.

12. You will need to repeat this oh... about 72 times to make the tread go
all the way around the tire...This takes a long time and this is why you
should use shaders when you can instead of making actual tread...

Actually, once I got around the tire a quarter of the way by duplicating, I
grouped this and duplicated/rotated it three more times with a quarter turn
around the future wheel's center each time.

13. Select all of these small groups (be careful not to select any lights
or cameras with them) and group them into ONE large group.

14. Center the hot spot of the large group.

15. Make the torus that will be the bulk of the tire by drawing the shape
in the free form modeler. Don't use a circle as the center... They don't
look that way...Make a bloated "C" and close it off. No need to go to this
length and then blow it by being lazy here... hehehe... Name this
"TireBody".

16. Leave the free form modeler by clicking "done" and center the tire's
body's hot point. (You should know this keystroke by now.)

17. Align the LARGE group with the TireBody, centering against hot points.

18. Rotate the TireBody by Shift-rotating against one of the working box
walls the x-z or the y-z projection of the TireBody so that it lays the
same way as the tread.

19. Unless you're really lucky, the TireBody won't fit the tread just yet.
That's why we centered thes objects. It is now a simple matter of scaling
the TireBody (remember to deselect the tread group) to fit the tread. Be
sure to use the scale commands that center the scaling function around the
hot point. Read the manual to find out how... In Mac, hold down
command-option keys as you scale the outside  box of the tire body until
you have a good fit. Adjust your TireBody box finally with an isometric
view from the side until the top and bottom are exactly where you want
them.

20. Group it all and render to your heart's content...

Some things are left up to you that are outside the scope of these
instructions...

A. Tire shaders.... Find out what you want these to be FIRST! Then apply
them to the very first "Y-pathed" you make... Otherwise you will have to
drag and drop shaders until 2010 AD. Someone mentioned dropping the shader on the master object. to get around the hassle of changing many shaders. I haven't used this feature much... I usually do it the hard way, but that doesn't mean you can't learn from my mistakes... ;-)

B. Try other shapes than a "Y"... Do a small Escher-like drawing where
these treads interlock and figure out how to arrange them in RDD, and use
them instead of a "Y". Although, this is what I used, I don't like the look
that much... But that is what the request was for...

The RDD file is in mac format... I don't know if they are cross platform
compatable. I won't include files with this letter because I don't think
everyone gives a rip about tires...

So for us who care, please feel free to snag this from my web page.

Thanks to the requester for an interesting problem. I would finally like to
add this... Unless you are doing an animation that REQUIRES a close view of
a tire, just use shaders on the outside edge of a torus. If you are doing a
closeup from a frog's-eye view of the tire, just before he gets run over,
use this tedious method for generating a tire...

Take care and happy rendering!
Get the finished tire in RDD format (zipped)
Take it apart and see what I'm talking about...

